Chapter 2 Modern text editors
Having learned the minimal basics of text editing with Vim, we’re now in a good position to appreciate the preferred “modern” text editors mentioned at the beginning of this tutorial. These editors include cross-platform native editors such as Sublime Text, Visual Studio Code, and Atom, and editors in the cloud like Cloud9. Modern editors are distinguished by their combination of power and ease of use: you can do fancy things like global search-and-replace, but (unlike Vim) they let you just click in a window and start typing. In addition, many of them (including Atom and Sublime) include an option to run in Vim compatibility mode, so even if you end up loving Vim you can still use a modern editor without having to give Vim up entirely.
Throughout the rest of this tutorial, we’ll explore the capabilities of modern text editors. We’ll end up covering all of the topics encountered in our discussion of Vim (Chapter 1), as well as many more advanced subjects, including opening files, moving around, selecting text, cut/copy/paste, deleting and undoing, saving, and finding/replacing—all of which are important for day-to-day editing. We’ll also discuss both menu items and keyboard shortcuts, which help make your text editing faster and more efficient.
For future reference, Table 2.1 shows the symbols for the various keys on a typical Macintosh keyboard. Apply your technical sophistication (Box 1.2) if your keyboard differs.
| Key | Symbol |
| Command | ⌘ |
| Control | ⌃ |
| Shift | ⇧ |
| Option | ⌥ |
| Up, down, left, right | ↑ ↓ ← → |
| Enter/Return | ↵ |
| Tab | ⇥ |
| Delete | ⌫ |
2.1 Choosing a text editor
While cloud IDEs have many advantages, every aspiring computer magician should learn at least one native editor (i.e., an editor that runs on your desktop operating system). While there are many editors to choose from, probably the most promising modern text editors in use today are Sublime Text (sometimes just called “Sublime”), Visual Studio Code (VScode), and Atom.1 Each has its own advantages and disadvantages.
2.1.1 Sublime Text
- Advantages
- Powerful, hackable, and easy to use
- Can be used for free in “evaluation mode”
- Fast and robust, even when editing huge files/projects
- Works cross-platform (Windows, macOS, Linux)
- Backed by a profitable company that has a good track record of support and development
- Disadvantages
- Free in neither the speech nor beer sense
- Has a mildly annoying popup that goes away only if you buy a license
- Costs $70 as of this writing
- Setting up command-line tools takes some fiddling
2.1.2 Visual Studio Code (VSCode)
- Advantages
- Powerful, with lots of packages
- Free to use
- Fast and robust, even when editing huge files/projects
- Works cross-platform (Windows, macOS, Linux)
- Backed by Microsoft
- Disadvantages
- Not open-source
- Backed by Microsoft
2.1.3 Atom
- Advantages
- Powerful, hackable, and easy to use
- Free in both the speech and beer senses (i.e., it both costs nothing and is open-source software)
- Works cross-platform (Windows, macOS, Linux)
- Easy to set up command-line tools
- Backed by collaboration powerhouse GitHub
- Disadvantages
- Reports of being slower in some cases than Sublime or VSCode
- Since GitHub’s acquisition by Microsoft, backed by Microsoft
- Archived by GitHub (see details below)
It’s hard to go wrong with any of these choices. Because of its simplicity and being 100% free, I used to recommend Atom as the best choice for new users. As discussed briefly in Chapter 1, though, in June 2022 GitHub announced plans to archive the Atom project in the blog post “Sunsetting Atom”. Because Atom is open-source, it’s likely that it will continue to be available in some form, but under the circumstances readers of this tutorial are especially encouraged to consider Visual Studio Code or Sublime Text as alternatives. Due to the difficulty of updating videos, the screencasts that accompany this tutorial still use Atom, but the screenshots and main examples in the written text now use Sublime Text, which is actually my main day-to-day editor. (Luckily, Sublime Text and Atom are nearly identical in many respects, even down to the exact keyboard shortcuts.)
The good news is that the skills in the sections that follow are near-universal; if you learn Atom but decide to switch to Sublime Text or VSCode (or even a cloud IDE) for your daily editing, most of the core ideas will translate easily. It is precisely because of unpredictable events like the sunsetting of Atom that Learn Enough Text Editor to Be Dangerous focuses on such general principles rather than on specific editors. As a result, the examples in this tutorial that happen to use Atom are still relevant despite this development. It also underscores the critical importance of technical sophistication (Box 1.2), which allows you to adapt to such changes without significant difficulty.
2.1.4 Exercises
Install and configure a text editor on your system as follows:
- Download and install either Sublime Text, Visual Studio Code, or Atom.
- If using Sublime Text, set up the
sublcommand by Googling for “sublime text command line” and following the instructions for your system. Apply your technical sophistication (Box 1.2) if you get stuck. You might also find it helpful to skip ahead to Section 3.3 to learn about how to configure your system’s path. - If using VSCode, set up the
codecommand by Googling for “visual studio code command line” and following the instructions for your system. - If using Atom, go to Atom > Install Shell Commands to enable the
atomcommand at the command line (Figure 2.1).

2.2 Opening
To open files, we’re going to use the command configured in Section 2.1.4 to launch the editor and open the file at the same time (a method we used with vim in Section 1.3). In Section 3.4, we’ll cover a second method (called “fuzzy opening”) that’s useful when editing a project with multiple files. I’ll assume you’re using the subl command, but if you’re using a different editor you should make the appropriate substitution (e.g., atom or code in place of subl).
Let’s get started by downloading a sample file, README.md, from the Web. As in Section 2.7.1 and Section 1.6, we’ll use the curl command to download the file at the command line:
curl.
$ curl -OL https://cdn.learnenough.com/README.md
As hinted at by the .md extension, the downloaded file is written in Markdown, a human-readable markup language designed to be easy to convert to HTML, the language of the World Wide Web.
After downloading README.md, we can open it at the command line as follows:
$ subl README.md
(If this doesn’t work, be sure you’ve installed the Sublime Text shell commands as shown in Section 2.1.4.) The result of opening README.md in Sublime Text should look something like Figure 2.2 or Figure 2.3. (If this is your first time opening Sublime Text, it’s also possible you’ll see a one-time greeting screen. As usual, apply Box 1.2.) Figure 2.2 shows the usual default, which is for “word wrap” to be off; because Markdown files are typically written using a long line for each paragraph, this setting isn’t ideal in this case, so I recommend turning on word wrap using the menu item shown in Figure 2.4.


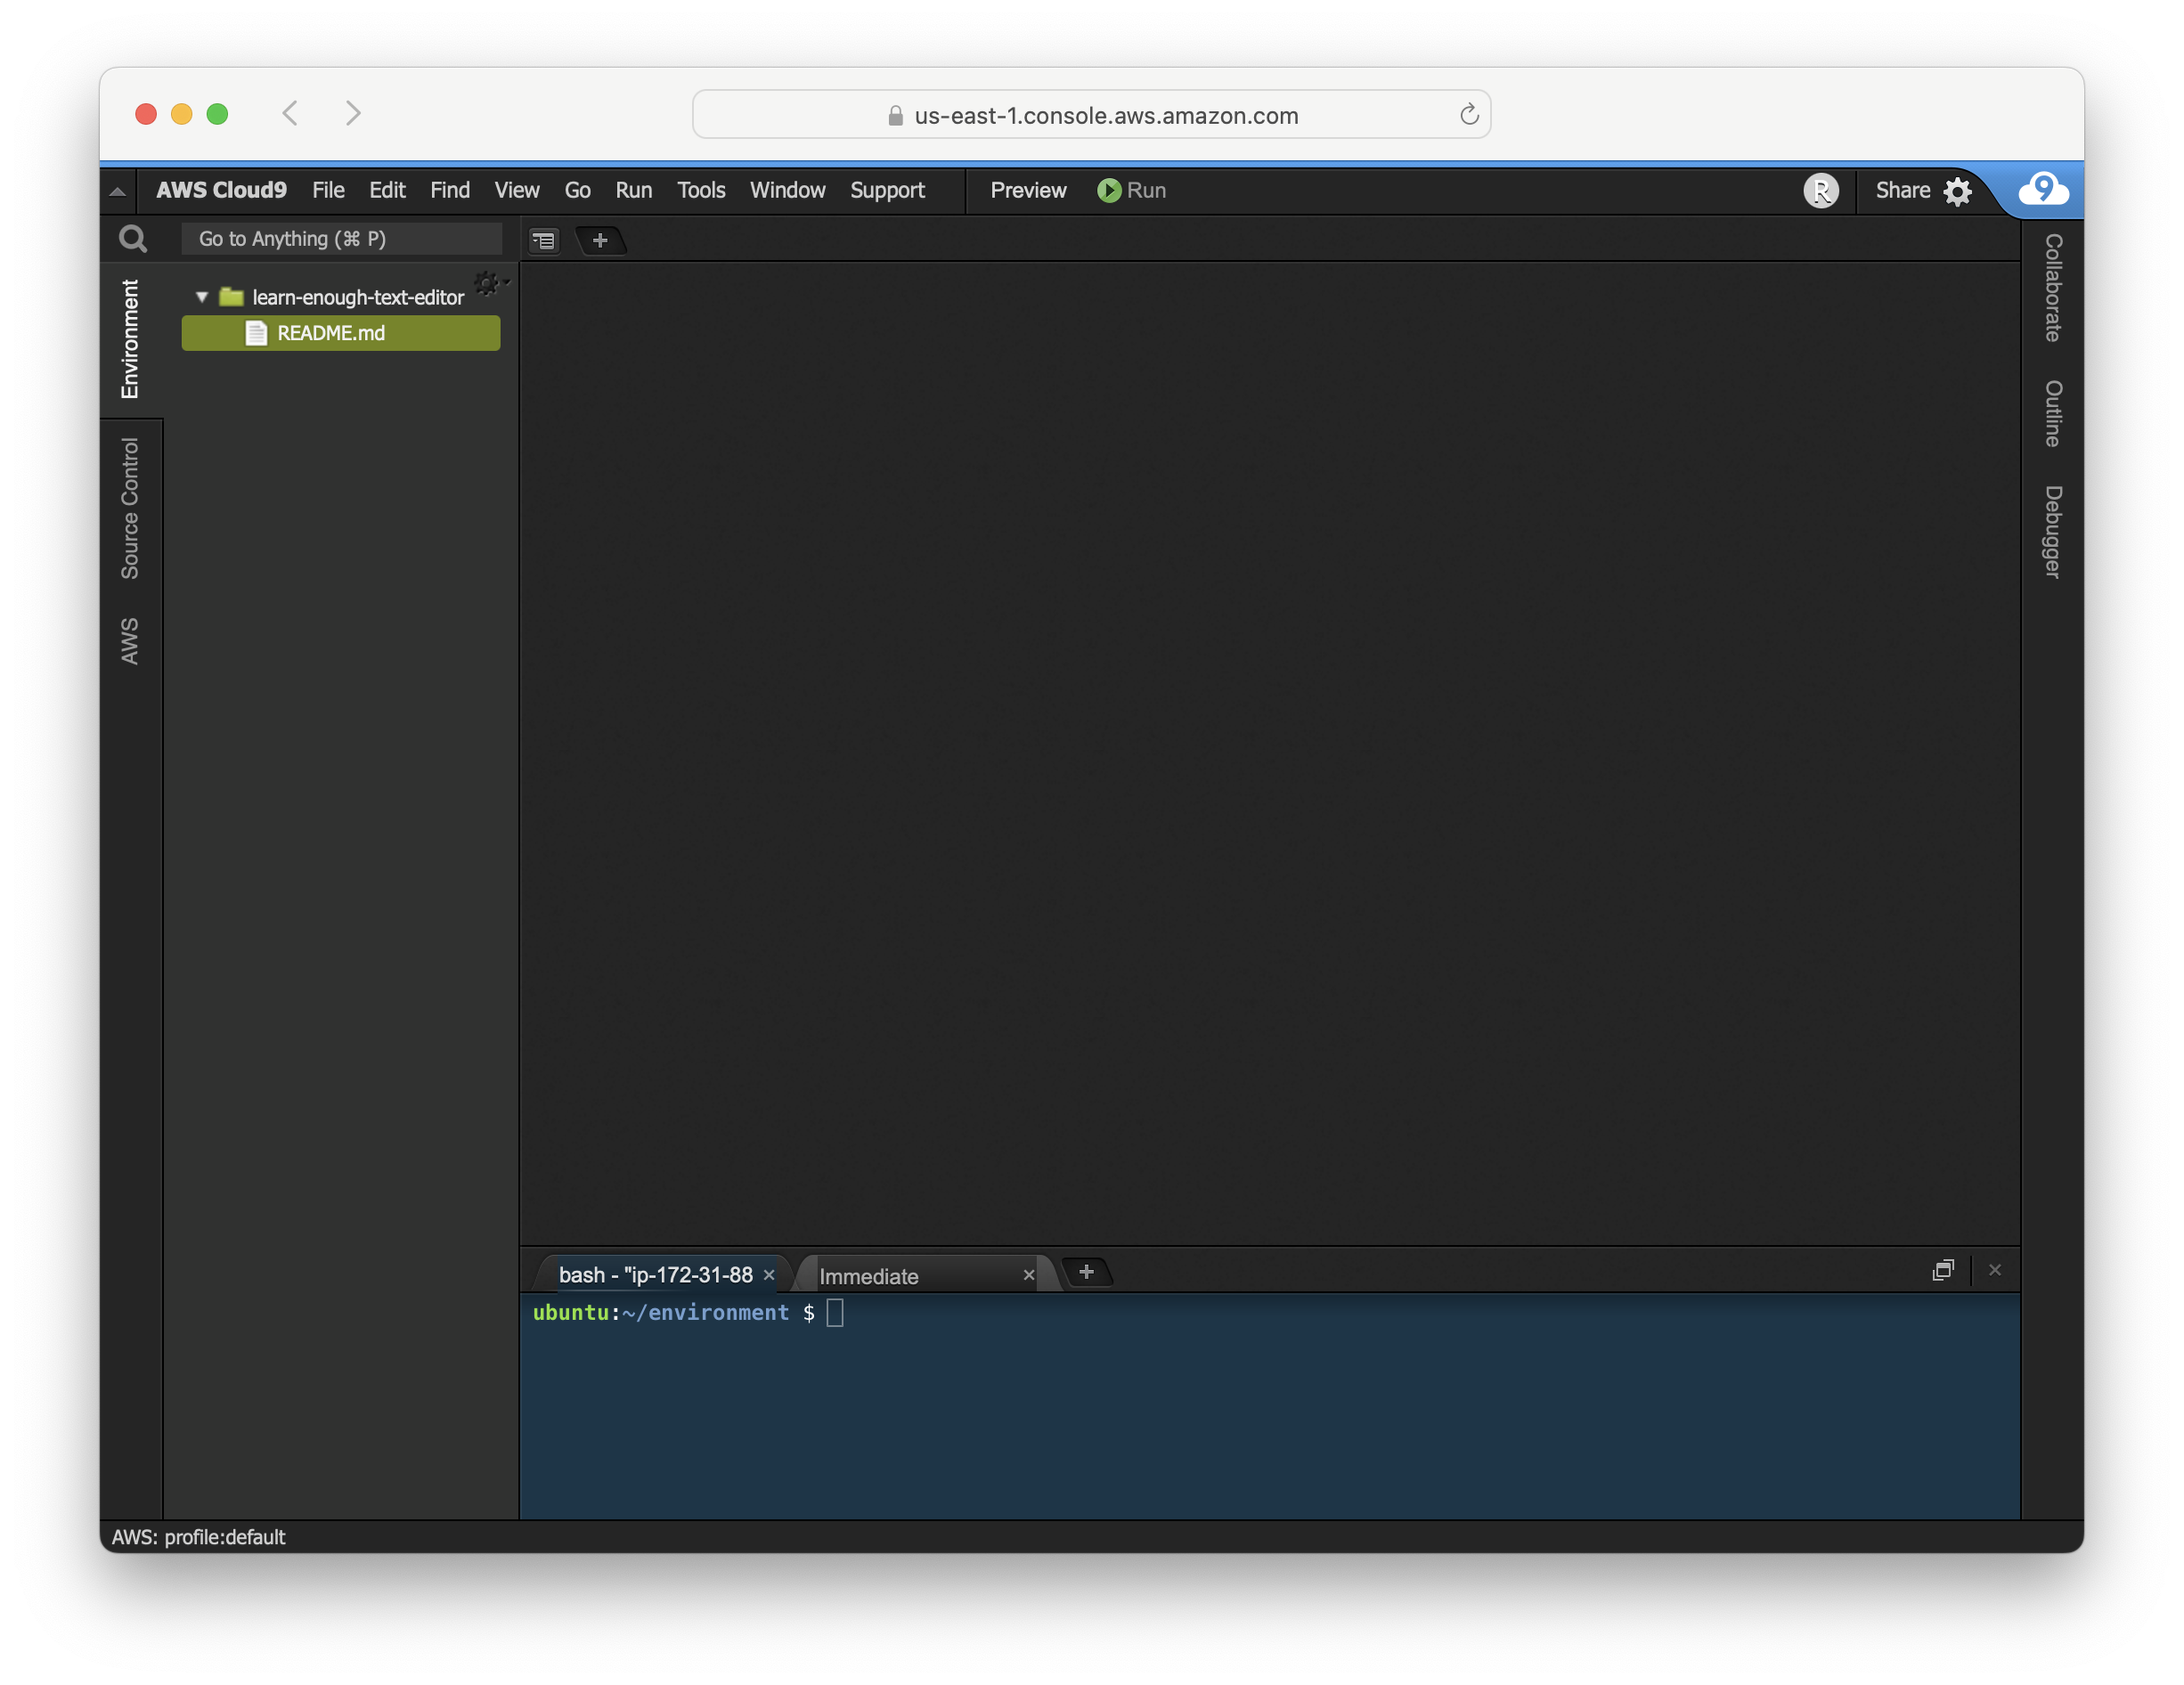
In some editors, such as the cloud IDE at Cloud9, it’s more common to open files using the filesystem navigator (although in fact the c9 command can be used to open files at the Cloud9 command line).2 Double-clicking on README.md in the filesystem navigator (Figure 2.5) opens the file in Cloud9’s editor, as shown in Figure 2.6. (If your results don’t match, be sure you’ve run the curl command shown in Listing 2.1.) Figure 2.7 shows the file after clicking Navigate to close the filesystem navigator, and we see that, as in Figure 2.2, the line extends inconveniently off the screen. We can fix this using View > Wrap Lines as shown in Figure 2.8, with the word-wrapped result appearing as in Figure 2.9. (Figuring out that a menu item like View > Wrap Lines turns on word wrap is exactly the kind of thing you should be able to figure out using your technical sophistication (Box 1.2).)

README.md.


2.2.1 Syntax highlighting
One thing you may have noticed from inspecting Figure 2.3 and Figure 2.9 is that both Sublime Text and Cloud9 display different aspects of the file in different colors. For example, Sublime Text shows characters inside square brackets [] (which represent text for HTML links) in a lighter color than the rest of the text, while Cloud9 shows the same text in green. This is a practice known as syntax highlighting, which makes special text formatting much easier to identify visually. It’s essential to understand that this practice is strictly for our benefit; as far as the computer is concerned, the document in question is still plain text.
You might wonder how Sublime Text and Cloud9 knew which highlighting scheme to use. The answer is that they infer the document format from the file type extension (in this case, .md for Markdown). The highlighting in Cloud9’s case is quite high-contrast, but in Sublime Text’s case it isn’t particularly prominent; the most significant things are the different colors for the heading
# Sample document
and for links like
[Michael Hartl](https://www.michaelhartl.com/)
We’ll see more dramatic examples of syntax highlighting in Section 2.7 and especially in Section 3.2.
2.2.2 Previewing Markdown
As a final trick, I’d like to note that some editors can preview Markdown as HTML. This section uses Atom because its Markdown previewer is especially easy to use, but see Section 3.5 for information on how to configure Sublime Text to do the same thing.
We can figure out how to preview Markdown with Atom using our technical sophistication (Box 1.2), in this case by clicking on the Help menu and searching for “Preview” (Figure 2.10). The result is a built-in package called Markdown Preview, which converts Markdown to HTML and shows the result, as seen in Figure 2.11. In this context, it’s convenient to work with an expanded width so that both the source and the preview are wide enough to view easily, as seen in Figure 2.12. This is accomplished by mousing over the side of the Atom window to get a double-arrow icon and then dragging to increase the size. We’ll see another example of this “double-paned” setup in a more general setting starting in Section 3.4.


2.2.3 Exercises
- By applying the methods in Box 1.2, find an online Markdown previewer (i.e., one that runs in a web browser), and use it to look at a preview of
README.md. How do the results compare to Figure 2.11? - Open a new document called
lorem.txtand fill it with the text shown in Listing 2.2. Does the result have syntax highlighting? - Open a new document called
test.rband fill it with the text shown in Listing 2.3. Does the result have syntax highlighting?
~/lorem.txt
Lorem ipsum dolor sit amet
~/test.rb
puts "test"
2.3 Moving
Unlike the commands for moving around in Vim (Chapter 1, summarized in Table 1.1), the commands for moving around in modern editors generally match the techniques used in other programs such as word processors, email programs, and web browsers. As a result, it’s possible you may already know some or all of these techniques; if you don’t, by following the steps in this section you’ll get better at navigating other programs as a side effect.
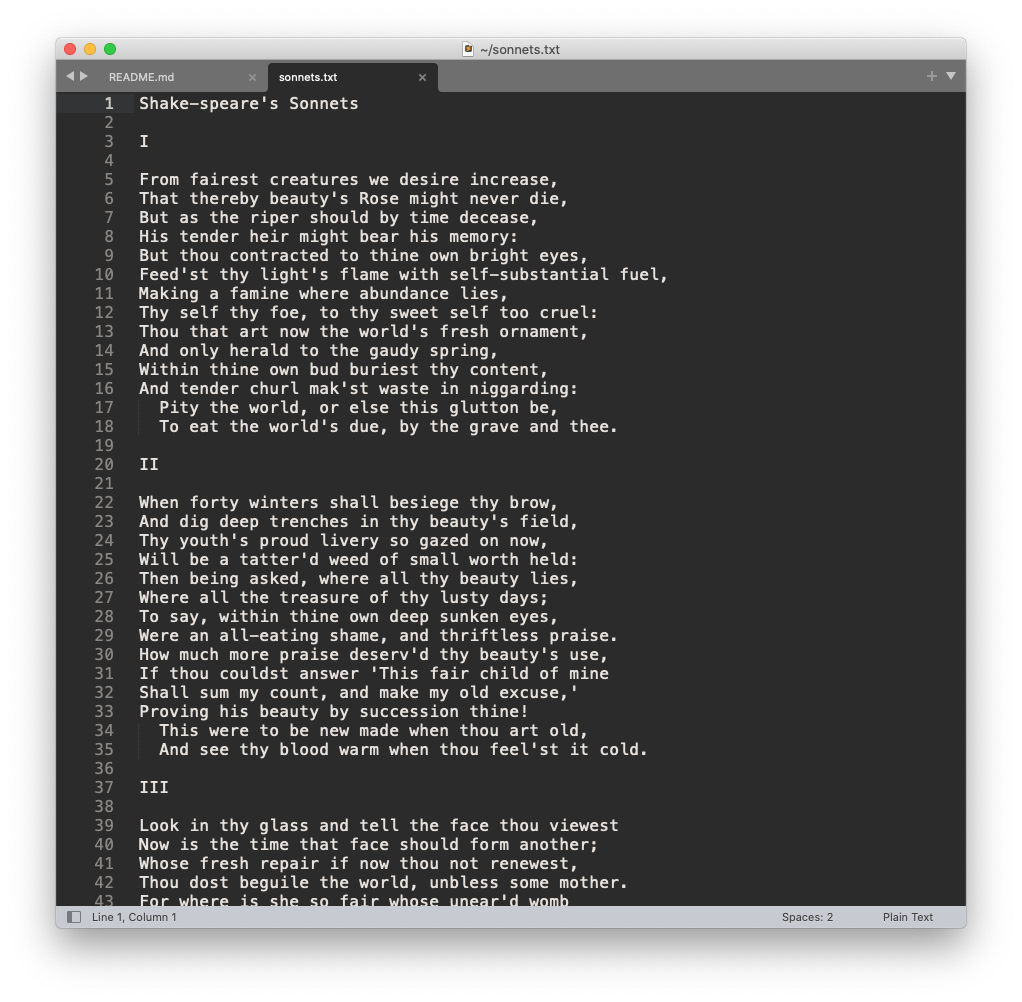
To get started, let’s open the large file from Section 1.6 consisting of the full text of Shakespeare’s Sonnets:
$ subl sonnets.txt
(If this doesn’t work, you may need to run the command in Listing 1.7, and you should also verify that you’re in the right directory.) The result appears in Figure 2.13. Note that Figure 2.13 shows sonnets.txt in its own tab, with README.md from Section 2.2 occupying the other tab. Your result may vary; in any case, we’ll discuss tabs further in Section 3.4.
As with most other native programs such as word processors, web browsers, etc., you can move around a modern editor using the mouse or trackpad. You can click to place the cursor, scroll using a scroll wheel or multi-touch gestures, or click and drag the scrollbar. Figure 2.14 shows the scrollbar for Sublime Text. Figure 2.14 also shows the sort of two-pane view mentioned briefly in Figure 2.12, which we’ll discuss more in Section 3.4.

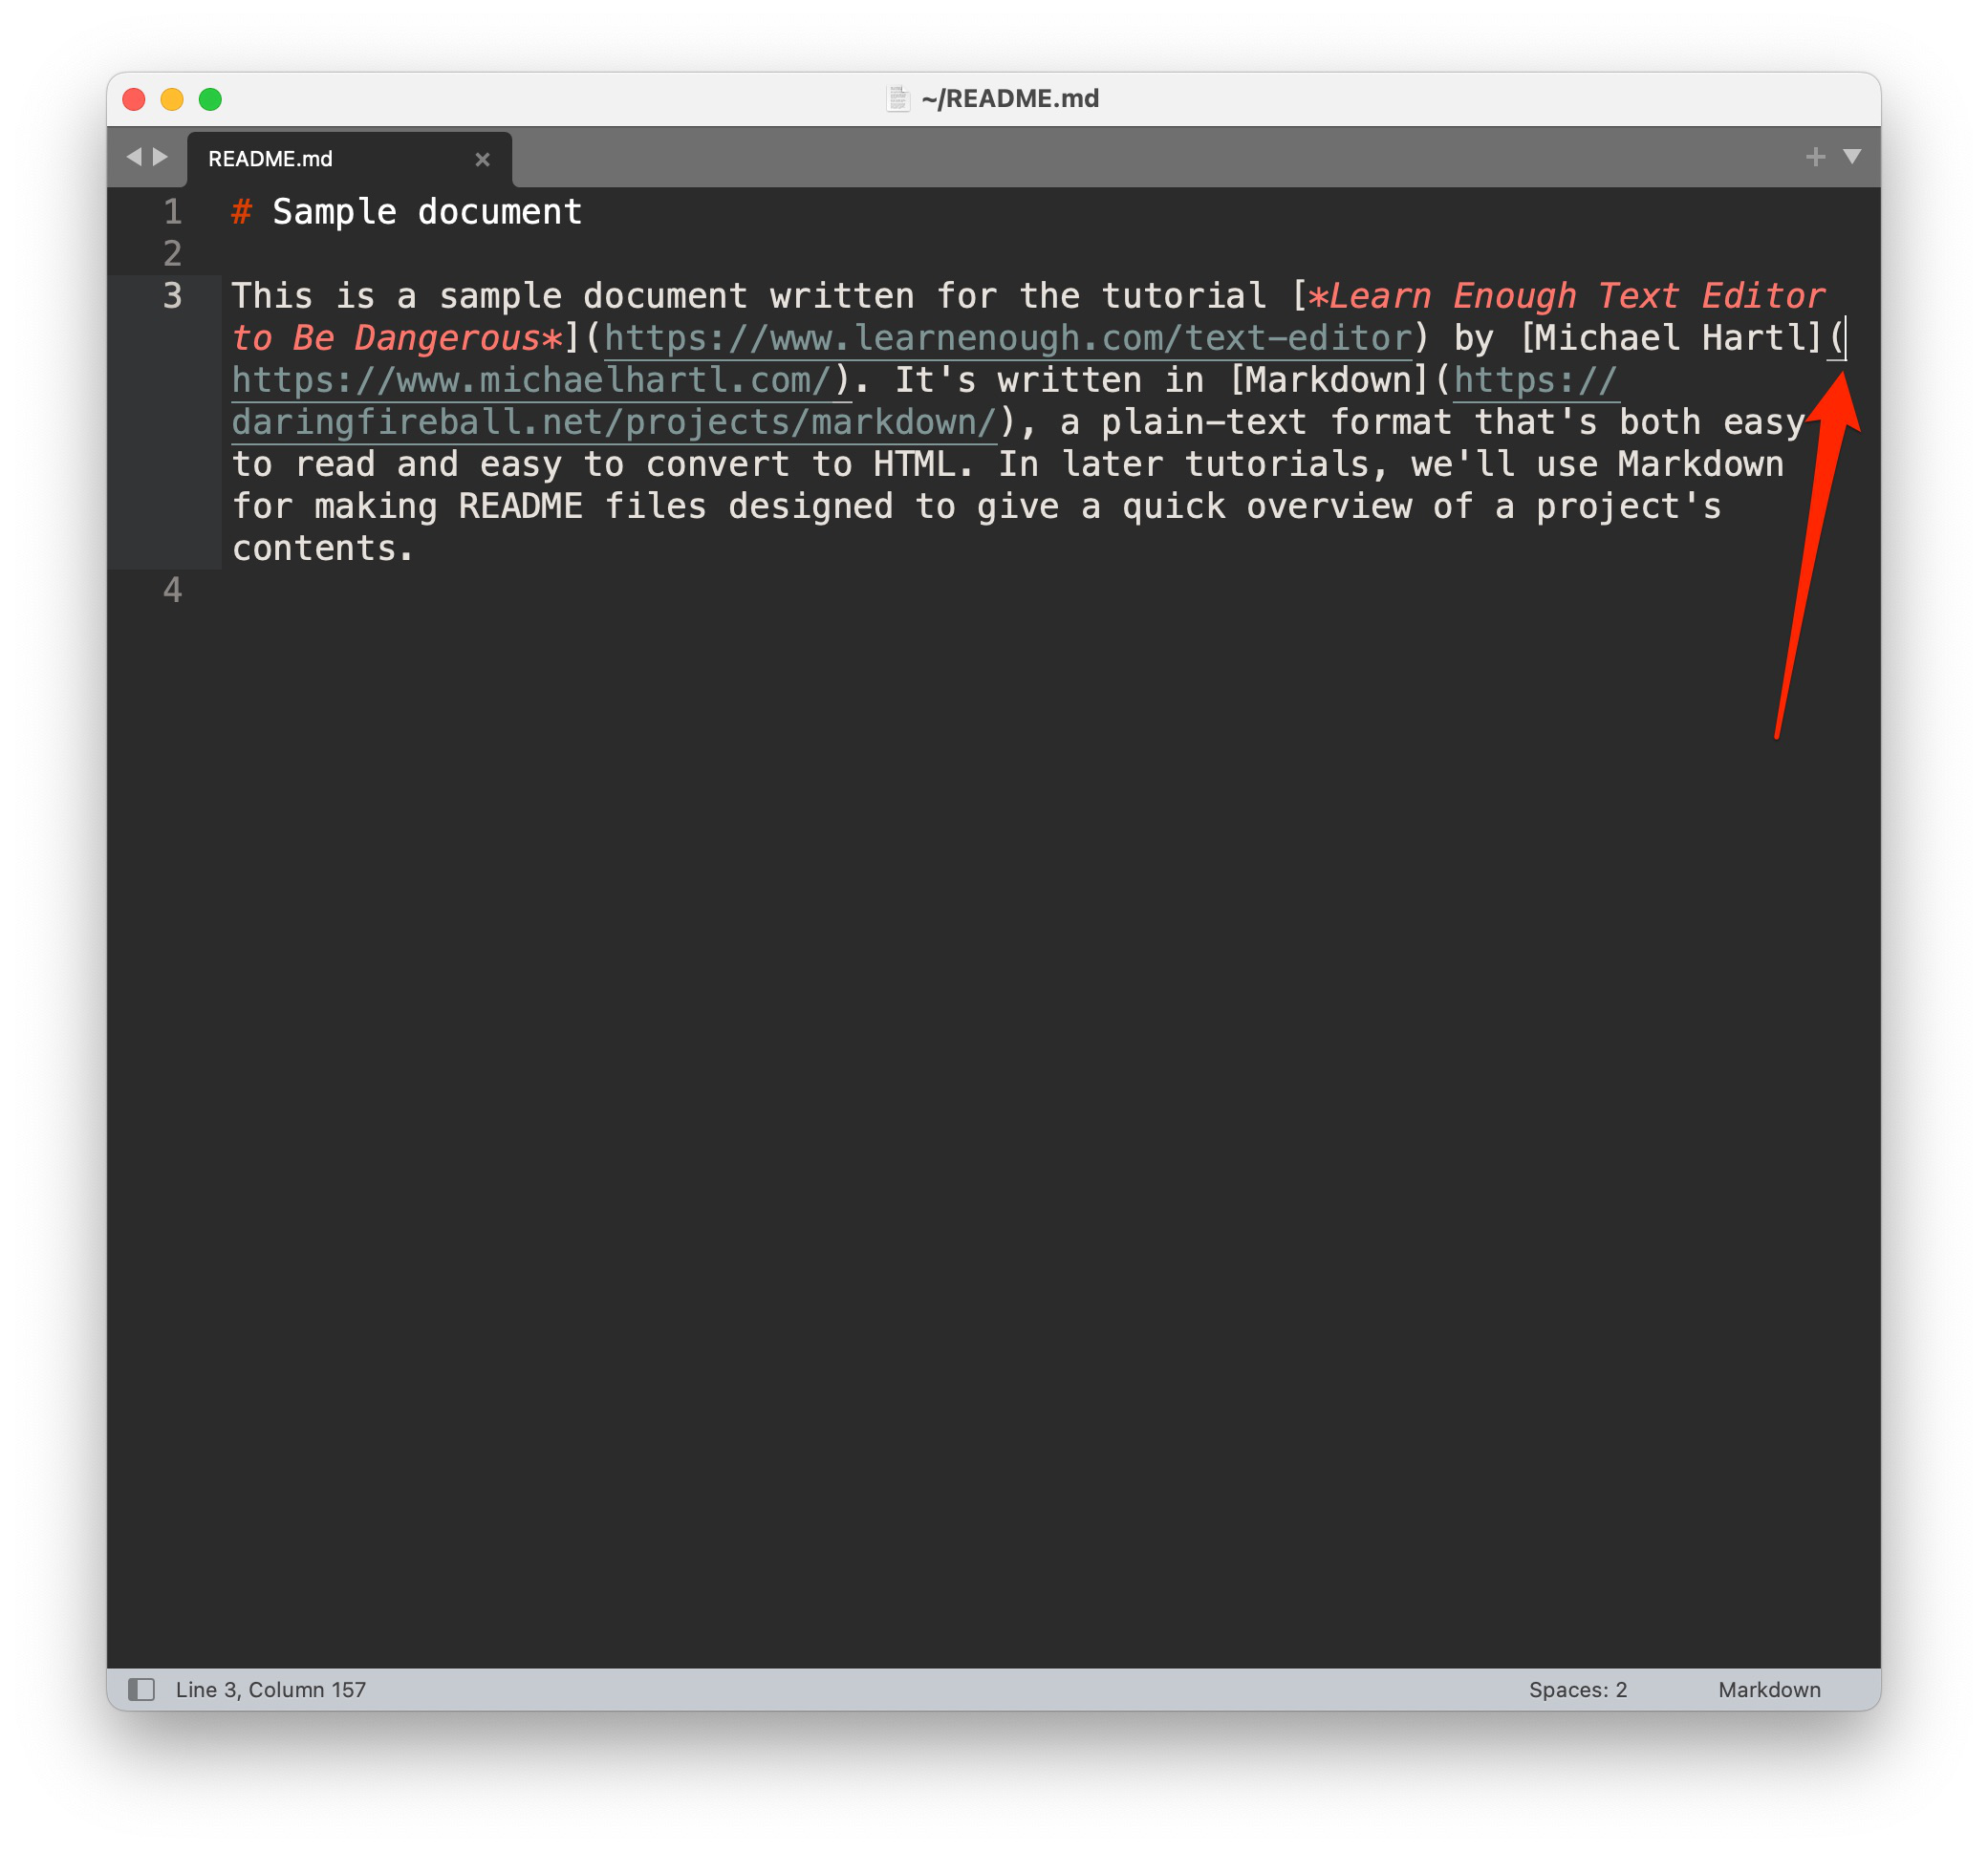
In addition to using the mouse or trackpad, I also like using the arrow keys to move around, typically in concert with the Command key ⌘ (Table 2.1). (In Linux, Command is typically replaced with the Function key fn, and in Windows it’s usually Ctrl, but you’ll have to apply Box 1.2 to figure out the details.) My text editing typically involves lots of ⌘← and ⌘→ to move to the beginnings and ends of lines, and ⌘↑ and ⌘↓ to move to the top and bottom of the file. An example of moving to the end of the line in README.md appears in Figure 2.15, and an example of moving to the end of the file in sonnets.txt appears in Figure 2.16.

2.3.1 Exercises
- In your text editor, how do you move left and right one word at a time? Hint: On some systems, the Option key ⌥ might prove helpful.
- In
README.md, move to the second-to-last nonblank line using whatever technique you wish. Then move to the third word from the beginning of that line. - What is the command to go to a particular line number? Use this command to go to line 293 of
sonnets.txt. What do rough winds do? - By moving to the last nonblank line of
sonnets.txtand pressing ⌘→ followed by ⌘←, show that ⌘← actually stops as soon as it reaches whitespace, with the result shown in Figure 2.17. How do you get to the true beginning of the line?

2.4 Selecting text
Selecting text is an important skill that is particularly useful for deleting or replacing content, as well as for cutting, copying, and pasting (Section 2.5). Many of the techniques in this section make direct application of the commands to move around covered in Section 2.3. As in that section, the ideas here are quite general, applying to a wide variety of applications, not just to text editors.
In much the same way that modern editors make it easy to use the mouse to move the cursor, they also make it easy to use the mouse to select text. Simply click and drag the mouse cursor, as shown in Figure 2.18. Another closely related technique is to click on one location, and then Shift-click on another location to select all the text in between.

2.4.1 Selecting a single word
When selecting text, there are some special cases that are useful enough to consider individually. We’ll start with some techniques for selecting a single word:
- Click and drag the mouse cursor over the word.
- Double-click the word with the mouse.
- Press ⌘D (system-dependent; see Box 1.2).
2.4.2 Selecting a single line
Another technique, especially important when editing line-based text like computer code (or sonnets), involves selecting a full line or collection of lines. We start with ways to highlight a single line:
- Click the beginning of the line and drag the cursor to the end.
- Click the end of the line and drag the cursor to the beginning
- Press ⌘← (twice) to get to the beginning of line, then press ⇧⌘→ to select to the end of line.
- Press ⌘→ to get to the end of line, then press ⇧⌘← (twice) to select to the beginning of line.
2.4.3 Selecting multiple lines
A comparably important technique is selecting multiple lines:
- Click and drag the mouse cursor over the words/lines.
- Hold down the Shift key and move the up- and down-arrow keys (⇧↑ and ⇧↓).
This latter technique is one of my personal favorites, and one of my most common editing tasks involves hitting ⌘← to go to the beginning of the first line I want to select and then hitting ⇧↓ repeatedly until I’ve selected all the lines I want (Figure 2.19). (As noted in Section 2.3.1, in many editors ⌘← stops on whitespace, so moving to the beginning of the line actually requires two uses of ⌘← in succession. Being able to figure out details and edge cases like this is a hallmark of growing technical sophistication (Box 1.2).)
2.4.4 Selecting the entire document
Finally, it’s sometimes useful to be able to select the entire document at once. For this, there are two main techniques:
- Use a menu item called “Select All” or something similar. The specifics are editor-dependent; Figure 2.20 shows the use of the Selection menu in Sublime Text.
- Press ⌘A.
Note from Figure 2.20 that the menu actually shows the corresponding command (⌘A); bootstrapping your knowledge using the menu items is a great way to learn keyboard shortcuts, which over time will make your text editing significantly more efficient.

2.4.5 Exercises
- Select Shakespeare’s second sonnet by clicking at the beginning and then Shift-clicking at the end.
- Select the first line in the file by moving to the beginning with ⌘↑ and pressing ⇧⌘→ (or the equivalent for your system).
- Delete the selection in the previous exercise (using the Delete key).
- Select the word “document” in
README.mdand replace it with “README”.
2.5 Cut, copy, paste
The Cut/Copy/Paste triumvirate is one of the most useful sets of operations when editing text, especially when executed via the conveniently located keyboard shortcuts ⌘X/⌘C/⌘V. (Cut/Copy/Paste are available as menu items (Figure 2.21), but the operations are so common that I strongly recommend learning and using the keyboard shortcuts right away.) Although only ⌘C is mnemonic (“C” for “Copy”), the keys are conveniently located three in a row on the bottom row of a standard QWERTY keyboard, which makes it easy to use them in combination or in quick succession (Figure 2.22).


Applying either Cut or Copy involves first selecting text (Section 2.4), and then hitting either ⌘X to Cut or ⌘C to Copy. When using ⌘C to Copy, the selected text is placed in a buffer (temporary memory area); moving to the desired location (Section 2.3) and hitting ⌘V lets you Paste the content into the document at the location of the cursor. ⌘X works the same way as ⌘C, except the text is removed from the document as well as being copied into the buffer.
As a concrete example, let’s select a Markdown link from the sample README file, README.md, as shown in Figure 2.23. After copying with ⌘C, we can then paste the link several times (with returns in between) by repeatedly hitting ⌘V and the Enter key, as shown in Figure 2.24. Finally, Figure 2.25 shows the result of cutting README from the main text and pasting it in at the end of the file.


2.5.1 Jumpcut
Although Cut/Copy/Paste is all that’s strictly necessary for everyday editing, there is one big downside, which is that there is only room in the buffer for a single string. Among other things, this means that if you Cut something and then accidentally hit “copy” instead of “paste” (which is easy since the letters are adjacent on the keyboard), you overwrite the buffer, and the text you Cut is gone forever (unless you undo as described in Section 2.6). If you happen to be developing on a Mac, there’s a solution to this problem: a free program called Jumpcut. This remarkable little utility app expands the buffer by maintaining more than one entry in the history. You can navigate this expanded buffer using either the Jumpcut menu (Figure 2.26) or the keyboard shortcuts ⌃⌥V (cycle forward) and ⇧⌃⌥V (cycle backward). I use Jumpcut dozens or even hundreds of times a day, and I strongly suggest giving it a try.

2.5.2 Exercises
- Select the entire document, Copy it, and Paste several times. The result should look something like Figure 2.27.
- Select the entire document and Cut it. Why might this be preferable to deleting it?
- Select and copy the couplet at the end of Sonnet 1 and paste it into a new file called
sonnet_1.txt. How do you create a new file directly in your editor?

2.6 Deleting and undoing
We mentioned deleting before in Section 2.4.5 (the exercises for Section 2.4), which of course simply involves pressing the Delete key, sometimes written as ⌫ (Table 2.1). As with Cut/Copy/Paste (Section 2.5), deletion is especially useful when combined with the selection techniques from Section 2.4.
In addition to the obvious technique of selecting and deleting text, on a Mac I especially like using ⌥⌫ to delete one word at a time. I’ll frequently use this combination if I need to delete a medium number of words (say 2–5) to restart a phrase when writing. For shorter deletion tasks, such as one word, it’s usually faster to hit ⌫ repeatedly, as context-switching to use ⌥⌫ incurs some overhead that makes it faster to just delete directly. Don’t worry too much about these micro-optimizations, though; with experience, as a matter of course you’ll come up with your own set of favorite techniques.
Paired with deletion is one of the most important commands in the history of the Universe, Undo. In modern editors, Undo uses the native keybinding, typically ⌘Z or ⌃Z. Its inverse, Redo, is usually something like ⇧⌘Z or ⌘Y. You can also use the menu (typically Edit, as seen in Figure 2.28), but, as with Cut/Copy/Paste (Section 2.5), Undo is so useful that I recommend memorizing the shortcut as soon as possible. Without Undo, operations like deletion would be irreversible and hence potentially harmful, but with Undo it’s easy to reverse any mistakes you make while editing.

One practice I recommend is using Cut instead of Delete whenever you’re not 100% sure you’ll never want the content again. Although you can usually Undo your way to safety if you accidentally delete something important, putting the content into the buffer with Cut gives you an additional layer of redundancy. (Using Jumpcut (Section 2.5.1) gives you another layer still.)
Finally, Undo provides us with a useful trick for finding the cursor, a common task when editing larger files. The issue is that you’ll be writing some text and then need to move (Section 2.3) or find (Section 2.8) elsewhere in the document. On these occasions, it can be hard to relocate the cursor. There are several ways around this problem—you can move the arrow keys, or just start typing—but my favorite technique is to Undo and then immediately Redo (⌘Z/⇧⌘Z or ⌘Z/⌘Y), which is guaranteed to find the cursor without making any undesired changes.
2.6.1 Exercises
- Use Undo repeatedly until all the changes you’ve made to
README.mdhave been undone. - Using any technique you want from Section 2.4, select the word “written” in
README.mdand delete it, then undo the change. - Redo the change from the previous exercise, then undo it again.
- Make an edit somewhere in
sonnets.txt, then scroll around so you get lost. Use the Undo/Redo trick to find the cursor again. Then keep using Undo to undo all your changes.
2.7 Saving
Once we’ve made some edits to a file, we can save it using the menu or with ⌘S. I strongly recommend using the keyboard shortcut, which among other things makes it easier to save the file whenever you reach a temporary pause in your writing or coding—a valuable habit to cultivate. Basically, if you’re not doing something else, you should be hitting Save. This habit goes a long way toward preventing lost work (and, as discussed in Learn Enough Git to Be Dangerous, is especially powerful when combined with version control).
As an example, we can add some source code to our README file and save the result. We start by pasting in the code from Listing 2.4, as shown in Figure 2.29 (which includes some nice high-contrast syntax highlighting). As you can see from the circled indicator in Figure 2.29, Sublime Text (as with most modern editors) includes a subtle indicator that the file is unsaved, in this case a small open circle. After running Save (via ⌘S, for example), the circle disappears, to be replaced with an X (Figure 2.30).
```ruby
def hello
  puts "hello, world!"
end
```


2.7.1 Exercises
- Undo the pasting in of source code to restore the file to its original state.
- Figure out how to “Save As”, then save
README.mdascode_example.md, paste in the code example, and save the file. - The default Bash prompt for my command-line terminal appears as in Listing 2.5, but I prefer the more compact prompt shown in Listing 2.6. In Learn Enough Command Line to Be Dangerous, I promised to show how to customize the prompt in Learn Enough Text Editor to Be Dangerous. Fulfill this promise by editing the
.bashrcfile to include the lines shown in Listing 2.7. Source the Bash profile as in Listing 1.5 and confirm that the prompt on your system matches the one shown in Listing 2.6. (To learn how to customize the prompt using Z shell, the current default shell on macOS, see the Learn Enough blog post “Using Z Shell on Macs with the Learn Enough Tutorials”.)
MacBook-Air:~ mhartl$
[~]$
~/.bashrc
alias lr='ls -hartl'
# Customize prompt to show only working directory.
PS1='[\W]\$ '
2.8 Finding and replacing
One of the most powerful features of every good text editor is the ability to find and optionally replace text. In this section we’ll learn how to find and replace in a single file; in Section 3.4 we’ll discuss the more powerful (and much more dangerous) method of finding and replacing across multiple files.
To find inside a file, you can use the Find menu, shown in Figure 2.31, which also shows that ⌘F is the corresponding keyboard shortcut. Either one brings up a modal window where you can type in the string you’re searching for (Figure 2.32).


For example, suppose we search for the string “sample”. As seen in Figure 2.33, both “Sample” and “sample” are highlighted. The reason our search finds both is because we’ve opted to search case-insensitively (which is usually the default).

Figure 2.34 shows how to use the modal window to find “sample” and replace with “example”. In order to avoid replacing “Sample”, we first click on Find to select the next match, and then click on Replace to replace the second match (Figure 2.35). (Changing to case-sensitive search would also work in this case; learning how to do this is left as an exercise (Section 2.8.1).)


As seen in Figure 2.31, you can also type ⌘G to find the next match using a keyboard shortcut. This ⌘F/⌘G combination also works in many other applications, such as word processors and web browsers.
Finally, note that we have now changed “a sample” to “a example”, so as a final step we’ll change this to “an example” (Figure 2.36).

2.8.1 Exercises
- In Section 2.3.1, we found Sonnet 18 by going directly to line 293, but of course I didn’t search the file line by line to write the exercise. Instead, I searched for “shall I compare thee”. Use your text editor to search for this string in
sonnets.txt. On what line does “rosy lips and cheeks” appear? - The example in this section shows one of the pitfalls of mechanically finding and replacing text: we’ve ended up with the ungrammatical result “a example” instead of “an example”. Rather than fix this by hand, use find and replace to replace “a example” with “an example” in your document. (Although in the present case there’s only one occurrence, this more general technique scales up to documents much longer than our toy example.)
- What is the keyboard shortcut in your editor for finding the previous match?
- What is the keyboard shortcut to replace in the current buffer (file)? How does this differ from the keyboard shortcut for simply finding?
2.9 Summary
- Atom, Sublime Text, and VSCode are all excellent choices for a primary modern text editor.
- One common way to open files is to use a command at the command line.
- For files containing things like prose with long lines, it’s a good idea to turn on word wrap.
- Moving around text files can be accomplished many different ways, including using the mouse and arrow keys (especially in combination with the Command/Control key).
- One convenient way to select text is to hold down Shift and move the cursor.
- The Cut/Copy/Paste triumvirate is incredibly useful.
- Undo can save your bacon (Figure 2.37).3

Important commands from this chapter are summarized in Table 2.2.
| Command | Description |
| ⌘← | Move to beginning of line (stops on whitespace) |
| ⌘→ | Move to end of line |
| ⌘↑ | Move to beginning of file |
| ⌘↓ | Move to end of file |
| ⇧-move | Select text |
| ⌘D | Select current word |
| ⌘A | Select All (entire document) |
| ⌘X/⌘C/⌘V | Cut/Copy/Paste |
| ⌘Z | Undo |
| ⇧⌘Z or ⌘Y | Redo |
| ⌘S | Save |
| ⌘F | Find |
| ⌘G | Find next |