Learn Enough Command Line to Be Dangerous
A tutorial introduction to the Unix command line
Michael Hartl
Contents
About the author
Michael Hartl is the creator of the Ruby on Rails Tutorial, one of the leading introductions to web development, and is cofounder and principal author at Learn Enough. Previously, he was a physics instructor at the California Institute of Technology (Caltech), where he received a Lifetime Achievement Award for Excellence in Teaching. He is a graduate of Harvard College, has a Ph.D. in Physics from Caltech, and is an alumnus of the Y Combinator entrepreneur program.
Chapter 1 Basics
Learn Enough Command Line to Be Dangerous is an introduction to the command line for complete beginners, the first in a series of tutorials designed to teach the common foundations of “computer magic” (Box 1.1) to as broad an audience as possible. It is aimed both at those who work with software developers and those who aspire to become developers themselves. Unlike most introductions to the command line, which typically assume a relatively high level of technical sophistication, Learn Enough Command Line to Be Dangerous assumes no prerequisites other than general computer knowledge (how to launch an application, how to use a web browser, how to touch type, etc.). Among other things, this means that it doesn’t assume you know how to use a text editor, or even what a text editor is. Indeed, this tutorial doesn’t even assume you know what a command line is, so if you’re confused by the title, you’re still in the right place. Finally, even if you already know how to use the command line, following this tutorial (and doing the exercises) will help fill in any gaps in your knowledge, and might even teach you a few new things.
Computers may be as close as we get to magic in the real world: we type incantations into a machine, and—if the incantations are right—the machine does our bidding. To perform such magic, computer witches and wizards rely not only on words, but also on wands, potions, and an ancient tome or two. Taken together, these tricks of the trade are known as software development: computer programming, plus tools like command lines, text editors, and version control. Knowledge of these tools is perhaps the main dividing line between “technical” and “non-technical” people (or, to put it in magical terms, between magicians and Muggles). The present tutorial represents the first step needed to cross this technical/non-technical divide. The resulting technical sophistication (Box 1.4) will make us software magicians—able to cast computer spells, and get the machine to do our bidding.
I’m Michael Hartl, and I am perhaps best known as the creator of the Ruby on Rails Tutorial, a book and screencast series that together constitute one of the leading introductions to web development. (You may also know me, in my more mathematical mode, as the founder of Tau Day and author of The Tau Manifesto.) One of the most frequently asked questions about the Rails Tutorial is, “Is the Rails Tutorial good for complete beginners?” The answer is, “Not really.” While it is possible for complete beginners to learn web development with the Ruby on Rails Tutorial (and an impressively large number have), it can be challenging and occasionally frustrating, and I don’t generally recommend it. Instead, I recommend starting here.
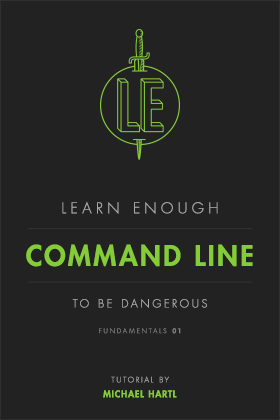
Many programming tutorials either gloss over the command line or assume you already know how to use it. But understanding the basics of the command line is absolutely essential to becoming a skilled developer.1 Indeed, if you look at the desktop of an experienced computer programmer, even on a system with a polished graphical user interface like macOS, you are likely to find a large number of “terminal windows”, each containing a series of commands at a command line (Figure 1.1). Proficiency at the command line is also useful for anyone who needs to work with developers, such as product managers, project managers, and designers. Making this essential component of technical sophistication accessible to as broad an audience as possible is the goal of Learn Enough Command Line to Be Dangerous.
1.1 Introduction
As author Neal Stephenson famously put it, “In the Beginning… Was the Command Line.” Although a graphical user interface (GUI) can dramatically simplify computer use, in many contexts the most powerful and flexible way to interact with a computer is through a command-line interface (CLI). In such an interface, the user types commands that tell the computer to perform desired tasks. These commands can then be combined in various ways to achieve a variety of outcomes. An example of a typical command-line command appears in Figure 1.2.

This tutorial covers the basics of the Unix command line, where Unix refers to a family of operating systems that includes Linux, Android, iOS (iPhone and iPad), and macOS.2 Unix systems serve most of the software on the World Wide Web, run most mobile and tablet devices, and power many of the world’s desktop computers as well. As a result of Unix’s central role in modern computing, this tutorial covers the Unix way of developing software. The main exception to Unix’s dominance is Microsoft Windows, which is not part of the Unix tradition, but those who mostly develop using native Windows development tools will still benefit from learning the Unix command line. Among other things, at some point such users are likely to need to issue commands on a Unix server (e.g., via the “secure shell” command ssh), at which point familiarity with Unix commands becomes essential. As a result, Windows users are encouraged to set up a Linux-compatible development environment by following the Windows steps in Learn Enough Dev Environment to Be Dangerous or use a Linux-based cloud IDE (which is also covered in Learn Enough Dev Environment to Be Dangerous).
1.2 Running a terminal
To run a command-line command, we first need to start a terminal, which is the program that gives us a command line. The exact details depend on the particular operating system you’re using.
macOS
On macOS, you can open a terminal window using the macOS application Spotlight, which you can launch either by typing ⌘␣ (Command-space) or by clicking on the magnifying glass in the upper right part of your screen. Once you’ve launched Spotlight, you can start a terminal program by typing “terminal” in the Spotlight Search bar. (If you are interested in using a more advanced and customizable terminal program, I recommend installing iTerm, but this step is optional.)
At this point, you might see the alert shown in Listing 1.1.
The default interactive shell is now zsh.
To update your account to use zsh, please run `chsh -s /bin/zsh`.
For more details, please visit https://support.apple.com/kb/HT208050.

[~]$
This alert is the result of a change made in macOS Catalina. You don’t need to do anything about it right now; we’ll address this issue the first time it makes any difference in this tutorial (Section 2.3). For more information, see the Learn Enough blog post “Using Z Shell on Macs with the Learn Enough Tutorials”.
Linux
On Linux, you can click the terminal icon as shown in Figure 1.3. The result should be something like Figure 1.4, although the exact details on your system will likely differ.
Windows
On Windows, the recommended option is to install Linux (which, incredibly, Microsoft has decided to support natively) as described in the Windows section of the free tutorial Learn Enough Dev Environment to Be Dangerous. Once Linux is installed, you should look for a terminal icon as described in Section 1.2.2. Apply your technical sophistication (Box 1.4) if you get stuck.
Terminal window
Regardless of which operating system you use, your terminal window should look something like Figure 1.4, though details may differ.

The example we saw in Figure 1.2 includes all of the typical elements of a command, as illustrated in Figure 1.5: the prompt (to “prompt” the user to do something) followed by a command (as in “give the computer a command”), an option (as in “choose a different option”),3 and an argument (as in the “argument of a function” in mathematics). It’s essential to understand that the prompt is supplied automatically by the terminal, and you do not need to type it. (Indeed, if you do type it, it will likely result in an error.) Moreover, the exact details of the prompt will differ, and are not important for the purposes of this tutorial (Box 1.2).

Every command line starts with some symbol or symbols designed to “prompt” you to action. The prompt usually ends with a dollar sign $ or a percent sign %, and is preceded by information that depends on the details of your system. For example, on some systems the prompt might look like this:
Michael's MacBook Air:~ mhartl$
In Figure 1.4, the prompt looks like this instead:
[~]$
and in Figure 1.5 it looks like this:
[projects]$
Finally, the prompt I’m looking at right now looks like this:
[learn_enough_command_line (first-draft)]$
For the purposes of this tutorial, the details of the prompt are not important, but we will discuss useful ways to customize the prompt starting in the next tutorial after this one (Learn Enough Text Editor to Be Dangerous).
1.2.1 Exercises
Learn Enough Command Line to Be Dangerous includes a large number of exercises. I strongly recommend getting in the habit of attempting them before moving on to the next section, as they reinforce the material we’ve just covered and will give you essential practice in using the many commands discussed. It’s not generally the case that they are required to proceed, though, so if you get stuck it’s sometimes a good idea to continue forward and then revisit the exercise at a later time. Indeed, this is good advice for the main text as well—you’ll be surprised how often a seemingly impossible idea or intractable problem will look easy the second time around.
- By referring to Figure 1.5, identify the prompt, command, options, arguments, and cursor in each line of Figure 1.6.
- Most modern terminal programs have the ability to create multiple tabs (Figure 1.7), which are useful for organizing a set of related terminal windows.4 By examining the menu items for your terminal program (Figure 1.8), figure out how to create a new tab. Extra credit: Learn the keyboard shortcut for creating a new tab. (Learning keyboard shortcuts for your system is an excellent habit to cultivate.)


1.3 Our first command
We are now prepared to run our first command, which prints the word “hello” to the screen. (The place where characters get printed is known as “standard out”, which is usually just the screen, and rarely refers to a physical printer.) The command is echo, and the argument is the string of characters—or simply string for short—that we want to print. To run the echo command, type “echo hello” at the prompt, and then press the Return key (also called Enter):
$ echo hello
hello
$
(I recommend always typing the commands out yourself, which will let you learn more than if you rely on copying and pasting.) Here we see that echo hello prints “hello” and then returns another prompt. Note that, for brevity, I’ve omitted all characters in the prompt except the dollar sign $.
Just to make the pattern clear, let’s try a second echo command:
$ echo "goodbye"
goodbye
$ echo 'goodbye'
goodbye
$
Note here that we’ve wrapped “goodbye” in quotation marks—and we also see that we can use either double quotes, as in "goodbye", or single quotes, as in 'goodbye'. Such quotes can be used to group strings visually, though in many contexts they are not required by echo (Listing 1.2).5
$ echo hello, goodbye
hello, goodbye
$ echo "hello, goodbye"
hello, goodbye
$
One thing that can happen when using quotes is accidentally not matching them, as follows:
$ echo "hello, goodbye
>
At this point, it seems we’re stuck. There are specific ways out of this quandary (in fact, in this case you can just add a closing quote and hit return), but it’s good to have a general strategy for getting out of trouble (Figure 1.9).6 This strategy is called “Ctrl-C” (Box 1.3).

Ctrl-C.
When using the command line, there are lots of things that can get you in trouble, by which I mean the terminal will just hang or otherwise end up in a state that makes entering further commands difficult or impossible. Here are some examples of such commands:
$ echo "hello
$ grep foobar
$ yes
$ tail
$ cat
In every case, the solution is the same: hit Ctrl-C (pronounced “control-see”). Here Ctrl refers to the “control” key on your keyboard, and C refers to the key labeled “C”. Ctrl-C thus means “While holding down the control key, press C.” In particular, C does not refer to the capital letter C, so you should not press Shift in addition to Ctrl. (Ctrl-C sends a control code to the terminal and has nothing to do with producing a capital C when typing normal text.) The result of typing Ctrl-C is sometimes written as ⌃C, like this:
 $ tail
 ^C
The origins of Ctrl-C are somewhat obscure, but as a mnemonic I like to think of it as meaning “cancel”. However you remember it, do remember it: when you get into trouble at the command line, your best bet is usually to hit Ctrl-C.
Note: When Ctrl-C fails, 90% of the time hitting ESC (escape) will do the trick.
1.3.1 Exercises
- Write a command that prints out the string “hello, world”. Extra credit: As in Listing 1.2, do it two different ways, both with and without using quotation marks.
- Type the command
echo 'hello(with a mismatched single quote), and then get out of trouble using the technique from Box 1.3.
1.4 Man pages
The program we’re using to run a command line, which is technically known as a shell,7 includes a powerful (though often cryptic) tool to learn more about available commands. This tool is itself a command-line command called man (short for “manual”), and we use it by typing man and then the name of the command we want to learn more about:
$ man echo
The result is to print out a so-called man page for the command in question (in this case, echo). The details are system-dependent, but on my system the result of running man echo appears as in Listing 1.3.
man echo.
$ man echo
ECHO(1)          BSD General Commands Manual         ECHO(1)

NAME
   echo -- write arguments to the standard output

SYNOPSIS
   echo [-n] [string ...]

DESCRIPTION
   The echo utility writes any specified operands, separated by single blank
   (` ') characters and followed by a newline (`\n') character, to the stan-
   dard output.

   The following option is available:

   -n  Do not print the trailing newline character. This may also be
      achieved by appending `\c' to the end of the string, as is done by
      iBCS2 compatible systems. Note that this option as well as the
      effect of `\c' are implementation-defined in IEEE Std 1003.1-2001
      (``POSIX.1'') as amended by Cor. 1-2002. Applications aiming for
      maximum portability are strongly encouraged to use printf(1) to
      suppress the newline character.
:
On the last line of Listing 1.3, note the presence of a colon :, which indicates that there is more information below. The details of this last line are also system-dependent, but on any system you should be able to access subsequent information one line at a time by pressing the down arrow key, or one page at a time by pressing the spacebar. To exit the man page, press “q” (for “quit”). (This interface to the man pages is the same as for the less program, which we’ll learn about in Section 3.3.)

man to man.
Because man itself is a command, we can apply man to man (Figure 1.10),8 as shown in Listing 1.4.
man man.
$ man man
man(1)                                 man(1)

NAME
    man - format and display the on-line manual pages

SYNOPSIS
    man [-acdfFhkKtwW] [--path] [-m system] [-p string] [-C config_file]
    [-M pathlist] [-P pager] [-B browser] [-H htmlpager] [-S section_list]
    [section] name ...

DESCRIPTION
    man formats and displays the on-line manual pages. If you specify sec-
    tion, man only looks in that section of the manual. name is normally
    the name of the manual page, which is typically the name of a command,
    function, or file. However, if name contains a slash (/) then man
    interprets it as a file specification, so that you can do man ./foo.5
    or even man /cd/foo/bar.1.gz.

    See below for a description of where man looks for the manual page
    files.

OPTIONS
    -C config_file
:
We can see from Listing 1.4 that the synopsis of man looks something like this:
man [-acdfFhkKtwW] [--path] [-m system] [-p string] ...
This is what I meant above when I described man pages as “often cryptic”. Indeed, in many cases I find the details of man pages to be almost impossible to understand, but being able to scan over the man page to get a high-level overview of a command is a valuable skill, one well worth acquiring. To get used to reading man pages, I recommend running man <command name> when encountering a new command. Even if the details aren’t entirely clear, reading the man pages will help develop the valuable skill of technical sophistication (Box 1.4).
In mathematics, many subjects can be developed by applying pure deduction to a small number of assumptions, or axioms; examples include algebra, geometry, number theory, and analysis. As a result, such subjects are completely self-contained, and thus have no formal prerequisites—in principle, even a small child could learn them. In practice, though, something else is required, and mathematicians often recommend the informal prerequisite of mathematical maturity, which consists of the experience and general sophistication needed to understand and write mathematical proofs.
In technology, a similar skill (or, more accurately, set of skills) exists in the form of technical sophistication. In addition to “hard skills” like familiarity with text editors and the Unix command line, technical sophistication includes “soft skills” like looking for promising menu items and knowing the kinds of search terms to drop into Google (as illustrated in “Tech Support Cheat Sheet” from xkcd), along with an attitude of doing what it takes to make the machine do our bidding (Box 1.1).
These soft skills, and this attitude, are hard to teach directly, so as you progress through this and subsequent Learn Enough tutorials you should always be on the lookout for opportunities to increase your technical sophistication (such as, for example, learning how to get the gist of a program by scanning its man page (Section 1.4)). Over time, the cumulative effect will be that, like the author of “Tech Support Cheat Sheet”, you’ll have the seemingly magical ability to do everything in every program.
By the way, “Tech Support Cheat Sheet” is missing a few important techniques for solving common problems (listed here in increasing order of severity, which is the order in which you should try them):
- “Have you restarted the application?”
- “Have you rebooted the device?” or (closely related) “Have you turned it off, waited 30 seconds, and turned it on again?” (This is known as power cycling.)
- “Have you tried uninstalling and reinstalling the app?”
Step #2 alone probably solves 90% of unexplained computer problems.
1.4.1 Exercises
- According to the man page, what are the official short and long descriptions of
echoon your system? - As seen in Listing 1.2, by default the
echocommand prints its argument to the screen and then puts the new prompt on a new line. The way it does this is by appending a special character called a newline that literally puts the string on a new line. (The newline character is usually written as\n, pronounced “backslash n”.) Becauseechois often used in programs to print out a sequence of strings not separated by newlines, there is a special command-line option to prevent the newline from being inserted.By reading the man page for
echo, determine the command needed to print out “hello” without the trailing newline, and verify using your terminal that it works as expected. Hints: To determine the placement of the command-line option, it may help to refer to Figure 1.5. By comparing your result with Listing 1.5 and Listing 1.6, you should be able to verify that you’ve used the option properly. (Note: This exercise may fail when using the default terminal program on some older versions of macOS. In this case, I recommend installing iTerm (which isn’t a bad idea anyway).)
echo with a newline (without option).
hello
[~]$
echo without a newline (with option).
hello[~]$
1.5 Editing the line
Command lines include several features to make it easy to repeat previous commands, possibly in edited form. These and many other command-line features often involve special keys on the keyboard, so for reference Table 1.1 shows these symbols for the various keys on a typical Macintosh keyboard. Apply your technical sophistication (Box 1.4) if your keyboard differs.
| Key | Symbol |
| Command | ⌘ |
| Control | ⌃ |
| Shift | ⇧ |
| Option | ⌥ |
| Up, down, left, right | ↑ ↓ ← → |
| Enter/Return | ↵ |
| Tab | ⇥ |
| Delete | ⌫ |
One of the most useful ways to edit the line is to “up arrow” ↑, which simply retrieves the previous command. Pressing up arrow again moves further up the list of commands, while “down arrow” ↓ goes back toward the bottom.
Other common ways to edit the line use the control key, which (as we saw in Box 1.3) is usually written as Ctrl or ⌃. For example, when typing a new command, or dealing with a previous command, it is often convenient to be able to move quickly within the line. Suppose we typed
$ goodbye
only to realize that we wanted to put echo in front of it. We could use the left arrow key ← to get to the beginning of the line, but it’s easier to type ⌃A, which takes us there immediately. Similarly, ⌃E moves to the end of the line.9 Finally, ⌃U clears to the beginning of the line and lets us start over.
The combination of ⌃A, ⌃E, and ⌃U will work on most systems, but they don’t do you much good if you’re editing a longer line, such as this one containing the first line of Sonnet 1 by William Shakespeare (Listing 1.7).
$ echo "From fairest creatures we desire increase,"
Suppose we wanted to change “From” to “FRom” to more closely match the text from the original sonnet (Figure 1.11).10 We could type ⌃A followed by the right arrow key a few times, but on some systems it’s possible to move directly to the desired spot by combining the keyboard and mouse via Option-click. That is, you can hold down the Option key on your keyboard (if it exists),11 and then click with the mouse pointer on the place in the command where you want the cursor. This would let us move right to the “o” in “From”, allowing us to delete the “r” and yielding Listing 1.8 directly.

$ echo "FRom fairest creatures we desire increase,"
I usually move around the command line with a combination of ⌃A, ⌃E, and right & left arrow keys, but for longer commands Option-click can be a big help. (I also frequently change my mind about the exact command I’m typing, in which case I usually find that hitting ⌃U and starting over again is the fastest way to proceed.)
1.5.1 Exercises
- Using the up arrow, print to the screen the strings “fee”, “fie”, “foe”, and “fum” without retyping
echoeach time. - Starting with the line in Listing 1.7, use any combination of
⌃A,⌃E, arrow keys, or Option-click to change the occurrences of the short s to the archaic long s “ſ” in order to match the appearance of the original (Figure 1.11). In other words, the argument toechoshould read “FRom faireſt creatures we deſire increaſe,”. Hint: It’s unlikely that your keyboard can produce “ſ” natively, so either copy it from the text of this tutorial or Google for it and copy it from the Internet. (If you have trouble copying and pasting into your terminal, I suggest applying the ideas in Box 1.4 to figure out how to do it on your system.)
1.6 Cleaning up
When using the command line, sometimes it’s convenient to be able to clean up by clearing the screen, which we can do with clear:
$ clear
A keyboard shortcut for this is ⌃L.
Similarly, when we are done with a terminal window (or tab) and are ready to exit, we can use the exit command:
$ exit
A keyboard shortcut for this is ⌃D.
1.6.1 Exercises
- Clear the contents of the current tab.
- Open a new tab, execute
echo 'hello', and then exit.
1.7 Summary
Important commands from this chapter are summarized in Table 1.2.
| Command | Description | Example |
echo <string> |
Print string to screen | $ echo hello |
man <command> |
Display manual page for command | $ man echo |
⌃C |
Get out of trouble | $ tail ⌃C |
⌃A |
Move to beginning of line | |
⌃E |
Move to end of line | |
⌃U |
Delete to beginning of line | |
| Option-click | Move cursor to location clicked | |
| Up & down arrow | Scroll through previous commands | |
clear or ⌃L
|
Clear screen | $ clear |
exit or ⌃D
|
Exit terminal | $ exit |
1.7.1 Exercises
- Write a command to print the string
Use "man echo", including the quotes; i.e., take care not to print outUse man echoinstead. Hint: Use double quotes in the inner string, and wrap the whole thing in single quotes. - By running
man sleep, figure out how to make the terminal “sleep” for 5 seconds, and execute the command to do so. - Execute the command to sleep for 5000 seconds, realize that’s well over an hour, and then use the instructions from Box 1.3 to get out of trouble.